 English
 Malay
Malay Swedish
 Finnish
 Danish
 Norwegian
 Polish
 Greek
Greek- Cable Coiling & Binding
- Tape Winding Machine
- Semi-Auto Wire Brush Machine
- Wire Cutting & Stripping
- Semi-Auto Crimping Machine
- Wire Stripper Crimper Blades
- Terminal Tensile Tester
- Cut-Off Machine
- Cable Labeling Machine
- Strapping Banding Tool
- Wire Terminals & Connectors
- Automated Tape Dispenser
- Automatic Wire Crimping Machine
- Terminal Crimping Tools
- Automatic Wire Feeder
- Automatic Soldering Machine
- Nylon Cable Tie Machine
- Injection Molding Machine
- Brazing & Welding Machine
- Screw Fastening Machine
- Power Cord Crimping Machine
- Wire Harness Tester
- Glue Dispensing Robot
- Wire Harness Packing Materials
New products


Home > Industry news
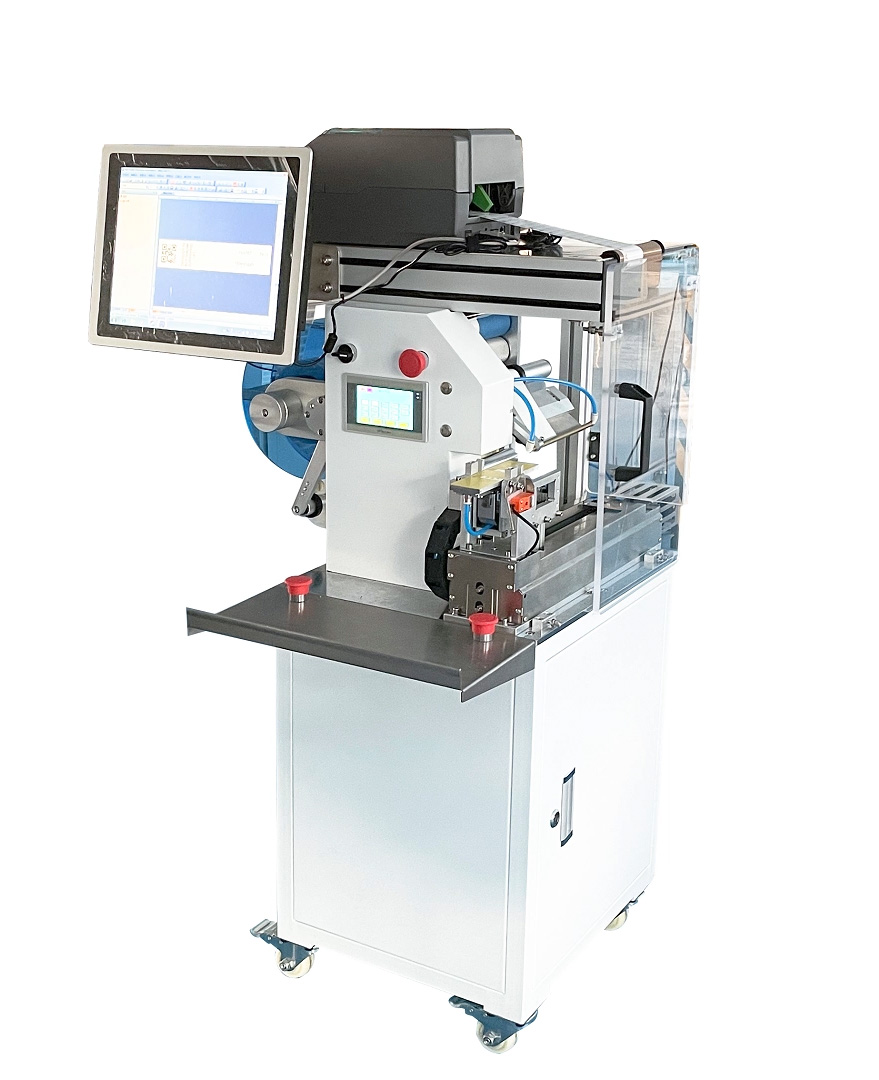
How to operate Automatic tube cutting winding and tying machine
How to operate Automatic tube cutting winding and tying machine
Product specification
Directory
One. Introduction and parameter description of machine development
Two. Machine safety precautions
Three. Machine parts maintenance and troubleshooting brief introduction
Four. Machine operation instructions
Machine development introduction and parameter description
1. Introduction to machine development
A. The product is positioned at high-quality wire manufacturers, suitable for wire harness/hose/rope;
B, high performance, the maximum speed can reach 600 pieces/hour;
C, automatic wire cutting, winding, and tying, saving labor;
D. The finished products after winding and tying are beautiful, generous, tidy, and easy to package to meet the high-quality requirements of customers;
E, small size, no space, save the rent.
F. Easy to operate, debug and maintain;
G, humanized design, greatly reduces staff fatigue intensity and improves work efficiency.
H, the machine adopts programmable controller (PLC) control, man-machine interface control, and automatic uninterrupted operation.
Device Name Model The main parts Technical parameters
Automatic tube cutting, winding, and tying machine Cylinder: Yadeke cylinder and solenoid valve
Motor: Winding main servo motor 1500W Turbot
Motor: online translation 750W servo motor
Motor: 750W servo motor for line translation
Motor: Feeding tape/twisting wire precise stepper motor
PLC: vigor
Screen: Dimension control
Take line translation: double slider
Lower jaw translation: double guide rail
Frame: iron frame
Power supply: clear weft
The driving system is a high reliability servo system
The control system is a high-speed and stable industrial controller and system software.
Automatic stop alarm when there is no material Winding appearance circle double tie tape
The inner diameter of the circle is 160-220mm
Applicable wire diameter 6-11mm
The length of the cutting line is 1-6m
Cutting line length tolerance ±60mm
Head and tail stay 100-300mm long
Production output 1 ≤600PCS/H (2m)
Into a diameter 40 mm or less
Apply to tie ≤ 7.5kg coated iron core
Applicable voltage 210-240V 5A
Machine power ≤2500W
Air pressure requirements 0.6-0.7 Mpa
Machine size: about 1500L*1150D*1650Hmm
Machine weight: about 500KG
Machine safety precautions
Before use (installation, operation, maintenance, overhaul), please be sure to read and fully master this manual and other auxiliary materials, in the familiar
Know all equipment knowledge, safety knowledge, and precautions before starting to use.
The safety precautions in this manual are divided into four categories: "danger", "attention", "mandatory" and "forbidden".
Danger Misoperation may result in death or serious injury.
Caution Misoperation is dangerous. Moderate or minor injuries may occur.
Mandatory compliance.
Prohibitive matters.
In addition, even the content recorded by "attention" will have serious consequences due to different circumstances, so any attention
All matters are extremely important and must be strictly observed.
Although it does not conform to the "caution" or "danger" content, it is also the user must strictly abide by the matters, recorded in the relevant place.
Machine debugging function and automatic function
Important note: Before running the machine, the technician must confirm the running status of the equipment;
1. Safety device
device Description of functional attention
Stop button When the emergency stop button is pressed, all mechanical action stops at once.
The button can be loosened by rotating clockwise. After the button is released, all actions are initialized.
The power switch When the power switch is NO, do not open the electrical box for non-professionals.
Leakage protection switch Over current protection, leakage protection.
The main gas source After the main air source is turned off, the mechanical part can move freely to avoid the danger of moving the mechanical part.
2. Mechanical aspects
2.1 Wear proper work clothes when operating the machine. Long hair needs to bind hair, do not lead belt or necklace.
2.2 Operation steps should be considered when operating the machine.
2.3 Close the protective door before starting the machine.
2.4 Press the emergency stop switch when the mechanical fault is removed.
2.5 No irrelevant sundries shall be put into the machine.
3. Electrical
3.1 The power panel and wiring terminal of the device always have electrical hazards. Check the device and ensure that the device is properly grounded.
3.2 Please turn off the main power supply before performing any maintenance in the electrical box. It is strictly prohibited to operate with power on.
3.3 Circuit maintenance and adjustment shall be operated by a professional electrician.
4. Procedural aspects
4.1 Winding, taking an on-line mechanism of high-speed moving parts is overloaded and powered off to ensure safety.
4.2 Manual When the first line is placed in the confirmed position, it is necessary to manually switch to the automatic mode in the man-machine interface to enable the machine to run fully. Effectively prevent misoperation.
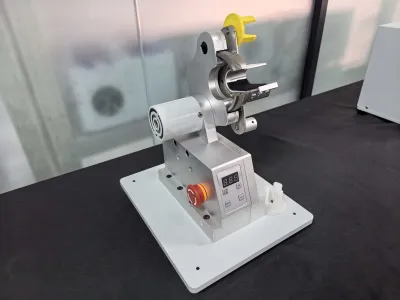
Machine parts maintenance and troubleshooting brief introduction
1. Overall drawing
1.2 Machine Maintenance
A. Keep the air source clean and dry.
B. Keep the machine clean.
C. Check whether the button switches in each part have relevant functions.
D. Whether the fastening screws at each part of the machine are loose
E. Check whether there is dust in the electrical box.
F. The moving speed of the moving parts and whether the wires in the related drag chain are damaged.
G. Wear the condition of the slide rails and belts of each coupling device.
H. Aging of the trachea.
J. Determination of insulation of electrical systems.
K. The lubricating oil should be 0# clean oil, which can only be added to all kinds of guide rails, not allowed to be added to the shaft of the cylinder.
2, line pressing line cutting mechanism
Common faults and troubleshooting:
1. The line keeps cutting
Check whether the wire cutter needs to be replaced.
2. The meter is not allowed
Check the wire wheel and meter gauge for proper pressure.
3. Machine short of material alarm stop. Check whether the cables are wired.
4. The line clip cannot clip the wire
Check whether the online origin induction lamp is in a reasonable position.
Check whether the line is aligned with the center of the wire cutter.
3、Winding mechanism
The roots loosen the screw on the winding column according to the inner diameter of the wire harness circle, move the winding column back and forth until the inner diameter of the circle is required for production, then screw it.
Adjust the position of the fixed winding clip according to the requirements of the length of the end and tail of the wire harness.
Common faults and troubleshooting:
The wound clip is not in line
Check whether the upper clamp is aligned with the winding clamp.
4、Take line organization
According to the size of the inner diameter of the winding column circle, adjust the spacing between the wire claws, and keep the center point and the center point of the winding column in a straight line.
Adjust the opening Angle of the claw according to the diameter of the wire harness.
Note: Keep the gap between the claw and the coiling column, do not interfere with each other.
Common faults and troubleshooting:
The cable clip cannot get the cable
Check whether the wire clip is aligned with the winding column;
Check whether the opening size of the wire clip is appropriate.
5、Claw mechanism under
Adjust the Angle of the lower jaw according to the binding thickness of the wire harness. Adjust the screw of the Angle of the lower jaw.
Adjust the distance between the lower claws according to the inner diameter of the wire harness circle.
Note: the center point between the two lower claws should be in a straight line with the center point of the wire grab and the center point of the winding column.
Common faults and troubleshooting:
The lower claw can't catch the wire
Check whether the cable clip is aligned with the lower claw.
Check for proper opening of lower claws.
Check whether the lower claw rubber band is properly installed and whether the tightness is appropriate.
6、Twisting strap mechanism
According to the spacing between the lower claws, adjust the spacing of torsion claws;
Adjust the transverse direction of the torsion claw and the lower claw consistent
Note: the center point between the two twisting claws should be in a straight line with the center point of the lower jaw, the center point of the line-taking claw, and the center point of the winding column.
Common faults and troubleshooting:
The cable cannot be twisted by twisting the tie tape
Check the direction of the twisted claw is crooked, manually twisting can be done;
Check whether the lower claw is aligned with the twisted claw;
Check whether the lower claw collides with the twisted claw and adjust the height of the twisted claw.
Check whether the lower claw mechanism has ties properly sent.
7、Out of tie belt mechanism
Common faults and troubleshooting:
1. The tie didn't come out well. Check whether the tie straps are knotted.
2. Tie to vomit slant
2. The warped lower arch of the tie belt is not straight.
The solution is to adjust the guide pulley and the adjusting plate of the tie belt to correct the tie belt.
9. Tie belt drum mechanism
Common faults and troubleshooting:
The tie won't vomit
Check whether the reel of the cable tie rotates smoothly
Check whether the tie is threaded through the tension spring
The ties are not the same length
Check whether the binder reel exceeds 7.5KG
Machine operation instructions
1, mechanical operation action decomposition
1.1. Winding mechanism: Adjust the winding column back and forth to the size required by production.
1.2. Loading mechanism: Adjust the wire clip before and after the winding mechanism winding clip.
1.3. Meter meter metering mechanism of wiring: adjust the wire wheel, wire clip, wire pressing mechanism, and meter mechanism to the appropriate pressure of the production wire, and adjust the wire clip in the center of the cutting tool before and after.
1.4. Wire-taking mechanism: adjust the wire-taking claw to the center of the winding column.
1.5. Lower claw mechanism: adjust the lower claw to take the center of the wire claw.
1.6. Pulling out strap mechanism: adjust to the proper position.
1.7. Twisting tape mechanism: adjust the twisting wire clip and take the wire auxiliary clip to the center of the lower claw.
1.8. Tie belt rack mechanism: Put the tie belt cylinder into the tie belt rack.
1.9. Manually pass the wire through the wire, wire pressing, meter, wire arrangement clamp, and other mechanisms to the cutter position.
1.10. Turn on the air source and slide the main air source switch to open.
1. 11. Turn on the power supply.
Important note: machine startup sequence: turn on the air -- turn on the power.Shutdown sequence: turn off the gas -- turn off the power.
Winding column/line clip/cutting/line clip/line clip/take clip/lower claw/twist claw into a straight line.
Tips: If you need to shut down temporarily during debugging, wait ten seconds before starting up again.
2. Digital touch screen man-machine interface function explanation
2.1. Boot into the main screen
Set batch output/meter cutting length/winding clamping time/manual mode, calculate the total output, test the tie tape/lock the winding disk/reset/output zero clearance/incoming material pressing, and other operations.
Set the winding number/winding speed/routing speed/Ribbon speed/Ribbon length/Twisting speed/winding end function.
Step-by-step detection of winding, clamping, arranging, taking up and down, translating, strapping, twisting, bending, and other actions.
Monitor the working condition of PLC signal input and output points
2.2. Click "Parameter Setting" and enter the password "6" to enter the parameter setting screen.
On this screen, you can set winding speed/winding number/Feeding tape speed/Feeding tape length/Delay of cutting tape/speed of twisting Tape/Time of laying out cables/Position of laying out cables/semi-automatic status/Output count function switch Stop/Winding end function switch according to different conditions and requirements of cables.
2.3. Click the operation Screen to enter the operation screen interface.
2.4. Cable tie test: test whether the length of the cable tie is appropriate/whether the cable tie is spat out in sequence/whether the cable tie is straight/whether the cable tie is cut off smoothly.
2.5. Manually point (pressing line), (winding lock) (reset) (manual mode).
(Note: the motor will not work when the winding lock is off, and the winding disk can rotate freely by hand)
Select the manual mode to start each winding or tying by manual button or foot.
Set the automatic mode to continuous winding and tying, with automatic layoff time intervals. (Do not use green hand)
2.6. Click "Manual Operation" to enter the manual operation setting interface, and click each button to check whether the adjustment position is reasonable.
On this screen, you can step by step to check the operation of every single mechanical device.
In this screen, you can set the incoming material online position.
In this screen, you can set the line-taking position after winding.
2.6. Return to Operation Screen: Click (manual mode) to switch to (automatic mode).
2.7. Man-machine operation panel click the start button to run the machine.
2.8. Measure the length of the first line manually and make reasonable compensation for the length of meters.
Click "I/O Monitoring" to enter the monitoring screen of PLC signal input and output points:
On the monitoring screen, gray indicates waiting status and red indicates running status.
Product specification
Directory
One. Introduction and parameter description of machine development
Two. Machine safety precautions
Three. Machine parts maintenance and troubleshooting brief introduction
Four. Machine operation instructions
Machine development introduction and parameter description
1. Introduction to machine development
A. The product is positioned at high-quality wire manufacturers, suitable for wire harness/hose/rope;
B, high performance, the maximum speed can reach 600 pieces/hour;
C, automatic wire cutting, winding, and tying, saving labor;
D. The finished products after winding and tying are beautiful, generous, tidy, and easy to package to meet the high-quality requirements of customers;
E, small size, no space, save the rent.
F. Easy to operate, debug and maintain;
G, humanized design, greatly reduces staff fatigue intensity and improves work efficiency.
H, the machine adopts programmable controller (PLC) control, man-machine interface control, and automatic uninterrupted operation.
Device Name Model The main parts Technical parameters
Automatic tube cutting, winding, and tying machine Cylinder: Yadeke cylinder and solenoid valve
Motor: Winding main servo motor 1500W Turbot
Motor: online translation 750W servo motor
Motor: 750W servo motor for line translation
Motor: Feeding tape/twisting wire precise stepper motor
PLC: vigor
Screen: Dimension control
Take line translation: double slider
Lower jaw translation: double guide rail
Frame: iron frame
Power supply: clear weft
The driving system is a high reliability servo system
The control system is a high-speed and stable industrial controller and system software.
Automatic stop alarm when there is no material Winding appearance circle double tie tape
The inner diameter of the circle is 160-220mm
Applicable wire diameter 6-11mm
The length of the cutting line is 1-6m
Cutting line length tolerance ±60mm
Head and tail stay 100-300mm long
Production output 1 ≤600PCS/H (2m)
Into a diameter 40 mm or less
Apply to tie ≤ 7.5kg coated iron core
Applicable voltage 210-240V 5A
Machine power ≤2500W
Air pressure requirements 0.6-0.7 Mpa
Machine size: about 1500L*1150D*1650Hmm
Machine weight: about 500KG
Machine safety precautions
Before use (installation, operation, maintenance, overhaul), please be sure to read and fully master this manual and other auxiliary materials, in the familiar
Know all equipment knowledge, safety knowledge, and precautions before starting to use.
The safety precautions in this manual are divided into four categories: "danger", "attention", "mandatory" and "forbidden".
Danger Misoperation may result in death or serious injury.
Caution Misoperation is dangerous. Moderate or minor injuries may occur.
Mandatory compliance.
Prohibitive matters.
In addition, even the content recorded by "attention" will have serious consequences due to different circumstances, so any attention
All matters are extremely important and must be strictly observed.
Although it does not conform to the "caution" or "danger" content, it is also the user must strictly abide by the matters, recorded in the relevant place.
Machine debugging function and automatic function
Important note: Before running the machine, the technician must confirm the running status of the equipment;
1. Safety device
device Description of functional attention
Stop button When the emergency stop button is pressed, all mechanical action stops at once.
The button can be loosened by rotating clockwise. After the button is released, all actions are initialized.
The power switch When the power switch is NO, do not open the electrical box for non-professionals.
Leakage protection switch Over current protection, leakage protection.
The main gas source After the main air source is turned off, the mechanical part can move freely to avoid the danger of moving the mechanical part.
2. Mechanical aspects
2.1 Wear proper work clothes when operating the machine. Long hair needs to bind hair, do not lead belt or necklace.
2.2 Operation steps should be considered when operating the machine.
2.3 Close the protective door before starting the machine.
2.4 Press the emergency stop switch when the mechanical fault is removed.
2.5 No irrelevant sundries shall be put into the machine.
3. Electrical
3.1 The power panel and wiring terminal of the device always have electrical hazards. Check the device and ensure that the device is properly grounded.
3.2 Please turn off the main power supply before performing any maintenance in the electrical box. It is strictly prohibited to operate with power on.
3.3 Circuit maintenance and adjustment shall be operated by a professional electrician.
4. Procedural aspects
4.1 Winding, taking an on-line mechanism of high-speed moving parts is overloaded and powered off to ensure safety.
4.2 Manual When the first line is placed in the confirmed position, it is necessary to manually switch to the automatic mode in the man-machine interface to enable the machine to run fully. Effectively prevent misoperation.
Machine parts maintenance and troubleshooting brief introduction
1. Overall drawing
1.2 Machine Maintenance
A. Keep the air source clean and dry.
B. Keep the machine clean.
C. Check whether the button switches in each part have relevant functions.
D. Whether the fastening screws at each part of the machine are loose
E. Check whether there is dust in the electrical box.
F. The moving speed of the moving parts and whether the wires in the related drag chain are damaged.
G. Wear the condition of the slide rails and belts of each coupling device.
H. Aging of the trachea.
J. Determination of insulation of electrical systems.
K. The lubricating oil should be 0# clean oil, which can only be added to all kinds of guide rails, not allowed to be added to the shaft of the cylinder.
2, line pressing line cutting mechanism
Common faults and troubleshooting:
1. The line keeps cutting
Check whether the wire cutter needs to be replaced.
2. The meter is not allowed
Check the wire wheel and meter gauge for proper pressure.
3. Machine short of material alarm stop. Check whether the cables are wired.
4. The line clip cannot clip the wire
Check whether the online origin induction lamp is in a reasonable position.
Check whether the line is aligned with the center of the wire cutter.
3、Winding mechanism
The roots loosen the screw on the winding column according to the inner diameter of the wire harness circle, move the winding column back and forth until the inner diameter of the circle is required for production, then screw it.
Adjust the position of the fixed winding clip according to the requirements of the length of the end and tail of the wire harness.
Common faults and troubleshooting:
The wound clip is not in line
Check whether the upper clamp is aligned with the winding clamp.
4、Take line organization
According to the size of the inner diameter of the winding column circle, adjust the spacing between the wire claws, and keep the center point and the center point of the winding column in a straight line.
Adjust the opening Angle of the claw according to the diameter of the wire harness.
Note: Keep the gap between the claw and the coiling column, do not interfere with each other.
Common faults and troubleshooting:
The cable clip cannot get the cable
Check whether the wire clip is aligned with the winding column;
Check whether the opening size of the wire clip is appropriate.
5、Claw mechanism under
Adjust the Angle of the lower jaw according to the binding thickness of the wire harness. Adjust the screw of the Angle of the lower jaw.
Adjust the distance between the lower claws according to the inner diameter of the wire harness circle.
Note: the center point between the two lower claws should be in a straight line with the center point of the wire grab and the center point of the winding column.
Common faults and troubleshooting:
The lower claw can't catch the wire
Check whether the cable clip is aligned with the lower claw.
Check for proper opening of lower claws.
Check whether the lower claw rubber band is properly installed and whether the tightness is appropriate.
6、Twisting strap mechanism
According to the spacing between the lower claws, adjust the spacing of torsion claws;
Adjust the transverse direction of the torsion claw and the lower claw consistent
Note: the center point between the two twisting claws should be in a straight line with the center point of the lower jaw, the center point of the line-taking claw, and the center point of the winding column.
Common faults and troubleshooting:
The cable cannot be twisted by twisting the tie tape
Check the direction of the twisted claw is crooked, manually twisting can be done;
Check whether the lower claw is aligned with the twisted claw;
Check whether the lower claw collides with the twisted claw and adjust the height of the twisted claw.
Check whether the lower claw mechanism has ties properly sent.
7、Out of tie belt mechanism
Common faults and troubleshooting:
1. The tie didn't come out well. Check whether the tie straps are knotted.
2. Tie to vomit slant
2. The warped lower arch of the tie belt is not straight.
The solution is to adjust the guide pulley and the adjusting plate of the tie belt to correct the tie belt.
9. Tie belt drum mechanism
Common faults and troubleshooting:
The tie won't vomit
Check whether the reel of the cable tie rotates smoothly
Check whether the tie is threaded through the tension spring
The ties are not the same length
Check whether the binder reel exceeds 7.5KG
Machine operation instructions
1, mechanical operation action decomposition
1.1. Winding mechanism: Adjust the winding column back and forth to the size required by production.
1.2. Loading mechanism: Adjust the wire clip before and after the winding mechanism winding clip.
1.3. Meter meter metering mechanism of wiring: adjust the wire wheel, wire clip, wire pressing mechanism, and meter mechanism to the appropriate pressure of the production wire, and adjust the wire clip in the center of the cutting tool before and after.
1.4. Wire-taking mechanism: adjust the wire-taking claw to the center of the winding column.
1.5. Lower claw mechanism: adjust the lower claw to take the center of the wire claw.
1.6. Pulling out strap mechanism: adjust to the proper position.
1.7. Twisting tape mechanism: adjust the twisting wire clip and take the wire auxiliary clip to the center of the lower claw.
1.8. Tie belt rack mechanism: Put the tie belt cylinder into the tie belt rack.
1.9. Manually pass the wire through the wire, wire pressing, meter, wire arrangement clamp, and other mechanisms to the cutter position.
1.10. Turn on the air source and slide the main air source switch to open.
1. 11. Turn on the power supply.
Important note: machine startup sequence: turn on the air -- turn on the power.Shutdown sequence: turn off the gas -- turn off the power.
Winding column/line clip/cutting/line clip/line clip/take clip/lower claw/twist claw into a straight line.
Tips: If you need to shut down temporarily during debugging, wait ten seconds before starting up again.
2. Digital touch screen man-machine interface function explanation
2.1. Boot into the main screen
Set batch output/meter cutting length/winding clamping time/manual mode, calculate the total output, test the tie tape/lock the winding disk/reset/output zero clearance/incoming material pressing, and other operations.
Set the winding number/winding speed/routing speed/Ribbon speed/Ribbon length/Twisting speed/winding end function.
Step-by-step detection of winding, clamping, arranging, taking up and down, translating, strapping, twisting, bending, and other actions.
Monitor the working condition of PLC signal input and output points
2.2. Click "Parameter Setting" and enter the password "6" to enter the parameter setting screen.
On this screen, you can set winding speed/winding number/Feeding tape speed/Feeding tape length/Delay of cutting tape/speed of twisting Tape/Time of laying out cables/Position of laying out cables/semi-automatic status/Output count function switch Stop/Winding end function switch according to different conditions and requirements of cables.
2.3. Click the operation Screen to enter the operation screen interface.
2.4. Cable tie test: test whether the length of the cable tie is appropriate/whether the cable tie is spat out in sequence/whether the cable tie is straight/whether the cable tie is cut off smoothly.
2.5. Manually point (pressing line), (winding lock) (reset) (manual mode).
(Note: the motor will not work when the winding lock is off, and the winding disk can rotate freely by hand)
Select the manual mode to start each winding or tying by manual button or foot.
Set the automatic mode to continuous winding and tying, with automatic layoff time intervals. (Do not use green hand)
2.6. Click "Manual Operation" to enter the manual operation setting interface, and click each button to check whether the adjustment position is reasonable.
On this screen, you can step by step to check the operation of every single mechanical device.
In this screen, you can set the incoming material online position.
In this screen, you can set the line-taking position after winding.
2.6. Return to Operation Screen: Click (manual mode) to switch to (automatic mode).
2.7. Man-machine operation panel click the start button to run the machine.
2.8. Measure the length of the first line manually and make reasonable compensation for the length of meters.
Click "I/O Monitoring" to enter the monitoring screen of PLC signal input and output points:
On the monitoring screen, gray indicates waiting status and red indicates running status.
×

Scan to Chat
🤖 AI Assistant
×
End Chat & Send Transcript